January 2022 (update)
I thought it would be prudent to post an update to this page as our system has undergone a few changes in the last 2 years.
It may make more sense to read the section titled April 2020 below before reading the next bit.
After using the system pretty successfully over the last 2 years, I did identify a couple of areas where I felt it could use some improvements.
The first area was with regards to the Bogart Trimetric battery monitor. While it was doing a pretty fair job of monitoring our energy usage, I was finding that over time (especially when not connected to shore power) the daily battery capacity was wandering off. To the point that if we didn't get a full charge during the day, it could be off by as much as 10-15% or more after a week or so.
Last summer I purchased a Victron BMV-712 and ran it together with the Bogart for several months and found it to be much more accurate. To the point where after a week or so the Victron would still be within a percent or 2 of actual capacity. I determined this by watching our charger during the last few minutes of the charging cycle. At the point where the charger would switch from Constant Current mode to Constant Voltage mode, indicating the batteries were almost full, the Victron would invariably reach 100% while the Bogart was still showing in the mid 90's. I believe the discrepancy stems from the Bogarts inability to take Peukerts Law into account.
The second was to add another pair of Battle Born Lithium batteries. While our 400 AH of batteries was quite sufficient to run the trailer under normal conditions, we found that during cloudy periods or early or late in the year when the days were short and sun was low in the sky, and with the added load of our residential fridge, we didn't have as much of an energy buffer as I would have liked. Battle Born claims that you can add new batteries to an existing string up to 2 years later. We had planned to pick up a couple more during the winter of 2020/2021 while down south but COVID messed up that plan. Last summer, I was able to find a dealer in Mississauga, ON that carried them and we picked up 2 more. Our string is now at 600 AH and seems to be doing fine.
The third major change was to upgrade the inverter. When we initially purchased the Magnum 2812, we did so because the one I wanted, the Hybrid MSH3012RV wasn't available. This fall, I happened onto a screaming Black Friday sale from Continuous Resources for a new Victron Multiplus II 2x120 inverter/charger which included free, a Cerbo GX and Touch 50 display. Separately, those 2 items were worth over $500! The 2 main advantages gained with the Multiplus is the dual 50 AMP transfer switch and its ability to boost incoming power if the loads exceed the shore connection or generator capability. Theoretically, we should be able to run both air-conditioners comfortably on a 30 Amp shore connection.
During December, I removed the Magnum inverter and its control panel along with the old Bogart battery monitor and installed the new Victron gear. I had been impressed with the Victron monitoring systems and was quite looking forward to seeing this in place of the older systems we had. The other nice feature of the Victron systems is its ability to upload on the fly data to a central server allowing access from anywhere in the world. You should be able to see our system performance in real time here.
The only thing missing was the collection and display of our solar performance as the Blue Sky controllers we have are not compatible with the Victron systems. Late in December though, I heard of a software upgrade that would allow the Victron Smart Shunt which is usually used as a battery monitor to act as a basic DC energy meter. I added one into the system so that it only sees the solar current and it now shows up on the monitor as if the solar controllers were Victron (or at least the key data anyway).Here are some updated photos of the installation with the new gear.
First off, the new inverter (with the original rats nest of wiring in behind).


And the new Touch 50 display in our control centre cabinet.

April 2020
Last summer we made the huge step and sold our sticks and bricks and decided to go full time in our RV. We had already come to the conclusion that were we to do that, the old Cameo just wouldn't be big enough. We had been looking around for a couple of years and had more or less decided on the rig we wanted going forward.
Once the house sold, we located one in Edmonton, Alberta and began the process to acquire it.
Our new full time rig is a 2019, Grand Design Solitude 374TH. The TH part signifies that it is a toy hauler. The garage is small, but big enough to house my fleet of RC Model aircraft.

It also has a fair bit of roof real estate that I can use to mount our new solar panels and lots of basement storage for the rest of the equipment.
While the system in the old Cameo worked very well for what we needed as 'most timers', there were a few areas where I felt I could do better and as this was now our full time home, felt the costs would be justified in a complete redesign. Also, we got a decent trade allowance for leaving the old system on the Cameo so it made sense to start from scratch. We did keep the old golf cart batteries and moved them into the front storage compartment in the Solitude.
Inverter
The first major piece of the puzzle was the inverter. An inverter is a piece of electronics that converts the 12 Volts DC supplied by the batteries that most of the trailer runs on to 120 Volts AC that most appliances like TV's, microwaves, toasters, etc. need.
There are hundreds of choices out there but we had a Magnum Dimensions in the Cameo and were quite happy with it. As a result I researched and decided on Magnums new MSH3012RV Hybrid unit. This unit has a number of features that are beyond the scope of this document but would have worked well for us. I ordered one in July and was given a 2 week delivery time frame. After not seeing any shipping notice, I contacted the vendor only to find that that model was temporarily unavailable but would be available in August. Fast forward to the middle of August and still no sign of it so contacted the vendor again only to find that model was now on a manufacturing hold and wouldn't likely be available until October. As we needed something sooner, we elected to go with a slightly lower end model, the MS2812. It lacked a few of the advanced features of the 3012 but would suffice for our needs. One important drawback to this unit vs the 3012 that I wanted is the internal transfer switch. The MSH3012RV has a 50 Amp rated, split phase transfer switch. The MS2812, while it has the split phase transfer switch, is only rated to 30 Amps. We just have to be aware that when we are plugged into a 50 Amp service, we have to limit our draw to 30 Amps.
One was ordered and in September, we picked it up.
Shortly after picking it up, I installed it in the front compartment alongside the batteries. This was only intended to be a temporary installation as I had plans for a major battery upgrade.

Batteries
We had 4 Trojan T-105 golf cart batteries in the old Cameo which had given us about 5 years of good service. Each of the last 2 years they were used probably 9 months of the 12 so were getting pretty tired. I was noticing that they were discharging faster than they previously had and were taking longer to reach full charge. Being they were the old technology, flooded lead acid style, in order to maximize their lifespan, we were typically only discharging them 30 to 40%. The maximum recommended depth of discharge for these is only 50% so for a total Amp/Hour capacity of 450 AH, we would only want to draw a maximum of 225 AH before recharging. As we would typically draw them down 150 to 200 AH between sundown and sunup, that didn't leave us a lot of reserve, especially if the weather was poor and we weren't getting much sun for solar charging. Of course, we could always fall back to the generator, but I don't like doing that unless really necessary.
With the new trailer we decided we wanted to go with the latest technology, Lithium Iron Phosphate or LiFePO4, or just Lithium for short.
Lithium has a number of major advantages for our application and a couple of serious limitations as well. The main advantages are that they do not suffer from the same depth of discharge limitations as flooded lead acid or FLA for short. They can be repeatedly discharged to virtually dead without damage. They can be rapidly recharged; 2 to 3 times the rate of FLA. Another big advantage is they are less that half the weight of FLA for the same size, and they can be mounted in any orientation. You don't have to worry about the electrolyte spilling out. Finally, unlike FLA there is no need to vent them. They do not off gas when being charged.
The main drawbacks are that they can't be recharged if they are much below freezing although they can be discharged when cold. This shouldn't be an issue for us as they will be installed in the living space which is heated. And finally the big one is the price. They are expensive! Where a standard golf cart battery can be had for between $100-$150, a good quality Lithium of the same capacity is around $900! If you do the math though, in the long haul, Lithium does work out as the cheaper solution. If properly cared for, their typical lifespan is 4-6 times that of a typical FLA style.
We decided to go with a brand made (assembled really) in the USA called Battle Born. They are 12 Volt and 100 AH each and weigh only 32 pounds. They have their own built in Battery Management System which controls how they charge and discharge and monitors the temperature so if it does get too cold, won't allow the batteries to charge. The BMS system will also shut them down if you try to discharge them too deeply.
As a starting point and as our budget was already stretched, we installed 4 of them. I am hoping to add a couple more next year.

While I mentioned previously that the Solitude had lots of real estate and could accommodate lots of solar capacity, there was a caveat. The Cameo had a fair bit of large open areas allowing the use of larger (and cheaper) residential panels. The Solitude however, while having more square footage, didn't have the large unobstructed area. I was going to have to use smaller panels and more of them.
One of the design criteria that I had used on my previous 2 installs was a 100% parallel installation. I chose this to minimize the amount of power loss if one or more panels became partially shaded. With series connected panels, if even one cell in one panel gets shaded, the entire series string will see a major degradation in performance. With parallel, only that single panel is affected. The downside to this is with parallel, larger wire gauge is needed to feed the power from the roof to the batteries.
Weighing all the pros and cons, what I decided to do was go with 200 Watt monocrystalline (slightly more efficient than poly) 36 cell panels. The main deciding factor was the width of the panel at just under 27". This would allow me to run 2 rows of panels down the sides of the roof on either side of the air conditioners.
I originally thought that 6 would suffice to begin with for 1200 watts but after thinking on it for a bit, decided to up the count to 9 for 1800 watts total. The roof would also accommodate these 9 without a problem.
This is the model and specs of the panels I decided to go with.

The other attractive factor was the price. At only $185 each, they were in the same cost/watt ball park as the larger residential panels and had lots of positive reviews.
The next major design element was the solar charge controller(s). On the Cameo, I had elected to go with a Morningstar MPPT controller. I thought about staying with Morningstar but at the price and with the fact that I would need 2 of their 60 Amp controllers, that option just wasn't feasible.
The next 2 options were Victron and BlueSky. I was genuinely torn between the 2 for quite a while but finally opted for the BlueSky solution. I chose their Solar Boost SB3024i controllers. As each controller is only rated to a maximum output of 40 Amps and my solar array was capable of around 90 Amps at 21 Volts or about 120 Amps at 14.5 Volts, that meant I would need 3 of them. They were also among the lesser cost controllers but still had a very good reputation in the industry. Also the 3 controllers would link together and effectively work as a single unit.

The final 2 pieces of the charging side of the project were the programming pieces. While the controllers can be crudely programmed using small switches (DIP switches) in the units themselves, better results can be obtained with one or both of their remote modules.
One feature I wanted was the ability to be able to program and manage the system from my laptop. Their Universal Communication Module fit that bill.

Shortly after purchasing the solar panels at $185 each, we noticed that the price for the same panels had dropped $20 each! I contacted the vendor and while they wouldn't refund me the difference, would give me credit toward other products. I had been planning to order BlueSky's IPN ProRemote to add to the system, as it would give me a bit of enhanced monitoring. As it was about the same as the credit we would be getting, they were able to send me the ProRemote at no charge.

Installation
I had planned to do most of the installation while we were down south so before we left, I tried to acquire as much of the hardware as possible.
The first major project was to install the new batteries and relocate and reconnect the inverter. As I mentioned, the temporary location for the inverter was in the front compartment with the old batteries. With the Solitude, there is a large empty space behind the rear wall in the front pass through. Grand Design had left this area in quite a mess at the factory so I spent a couple of days cleaning it up, moving a few things around to make space and generally preparing it for the new equipment.
We had decided to spend a few days at the Escapees park in Pahrump, NV while waiting for friends so this proved an opportune time. The first order of business was to install the batteries. There was just enough room under the steps leading from the kitchen up to the living room. I prepped them by connecting the cables and then slid the whole array into place. A couple of angle aluminum strips to hold them in place and that part was done. Next came the inverter. This was a bit more involved and required some planning, as while I was working on this, the trailer would not have any power of any kind. I first located where the inverter was to go, and then measured for the cables needed. I also had to relocate the old converter (battery charger) and transfer switch. Fortunately there was room to mount these items on the wall behind the hutch. After shutting down the power, I made all the necessary connections and fired it all back up. So far this had taken almost all day and it was starting to get dark. The cleanup could wait. It didn't take long though to realize that all wasn't well. For some reason only about half of the 120 Volt circuits were working! As it was getting hard to see, I decided to wait til morning to figure out what was wrong.
The next day it only took a few minutes to discover a minor wiring mistake. I had 2 wires crossed between the transfer switch and the inverter that was causing the problem. 20 minutes later all was working properly.
This shot shows the inverter on the floor, the batteries under the stairs and the transfer switch on the wall.

At this point we were just using the generator to recharge the batteries.
The next stage of the project would be the most involved. Installation of the solar panels, charge controllers and support equipment.
After leaving Pahrump, we spent 10 days in Death Valley where I didn't really have any time to work on the trailer but after that we headed off to some BLM land just south of Joshua Tree National Park.
Once settled and in some very hot weather, I got started on the solar. The first step was to get all the solar panels prepped. This involved modifying the panels and brackets slightly and then mounting the brackets to the panels. Of course I didn't have all the hardware I needed so several trips into Indio were needed. All in all this took about 4 or 5 days.
Once that was all done, the actual installation went pretty quick. The panels were up and mounted in about a day; 2 half days really, as it was still bloody hot! Next was all the wiring and getting the main feeds from the roof to the basement. This was pretty straight forward as Grand Design had built a proper cable chase between the roof and the front pass through with easy access at both ends.
Here the panels are mounted and ready for the wiring.

Lastly was mounting the charge controllers, disconnect switches, circuit breakers and hooking everything up. That took another couple of days and if I recall correctly was completed right around US Thanksgiving.
The last couple of items were to add the remote for the charge controllers and clean up a couple of the inverter cables. That was finished up in January when we were in Quartzsite.
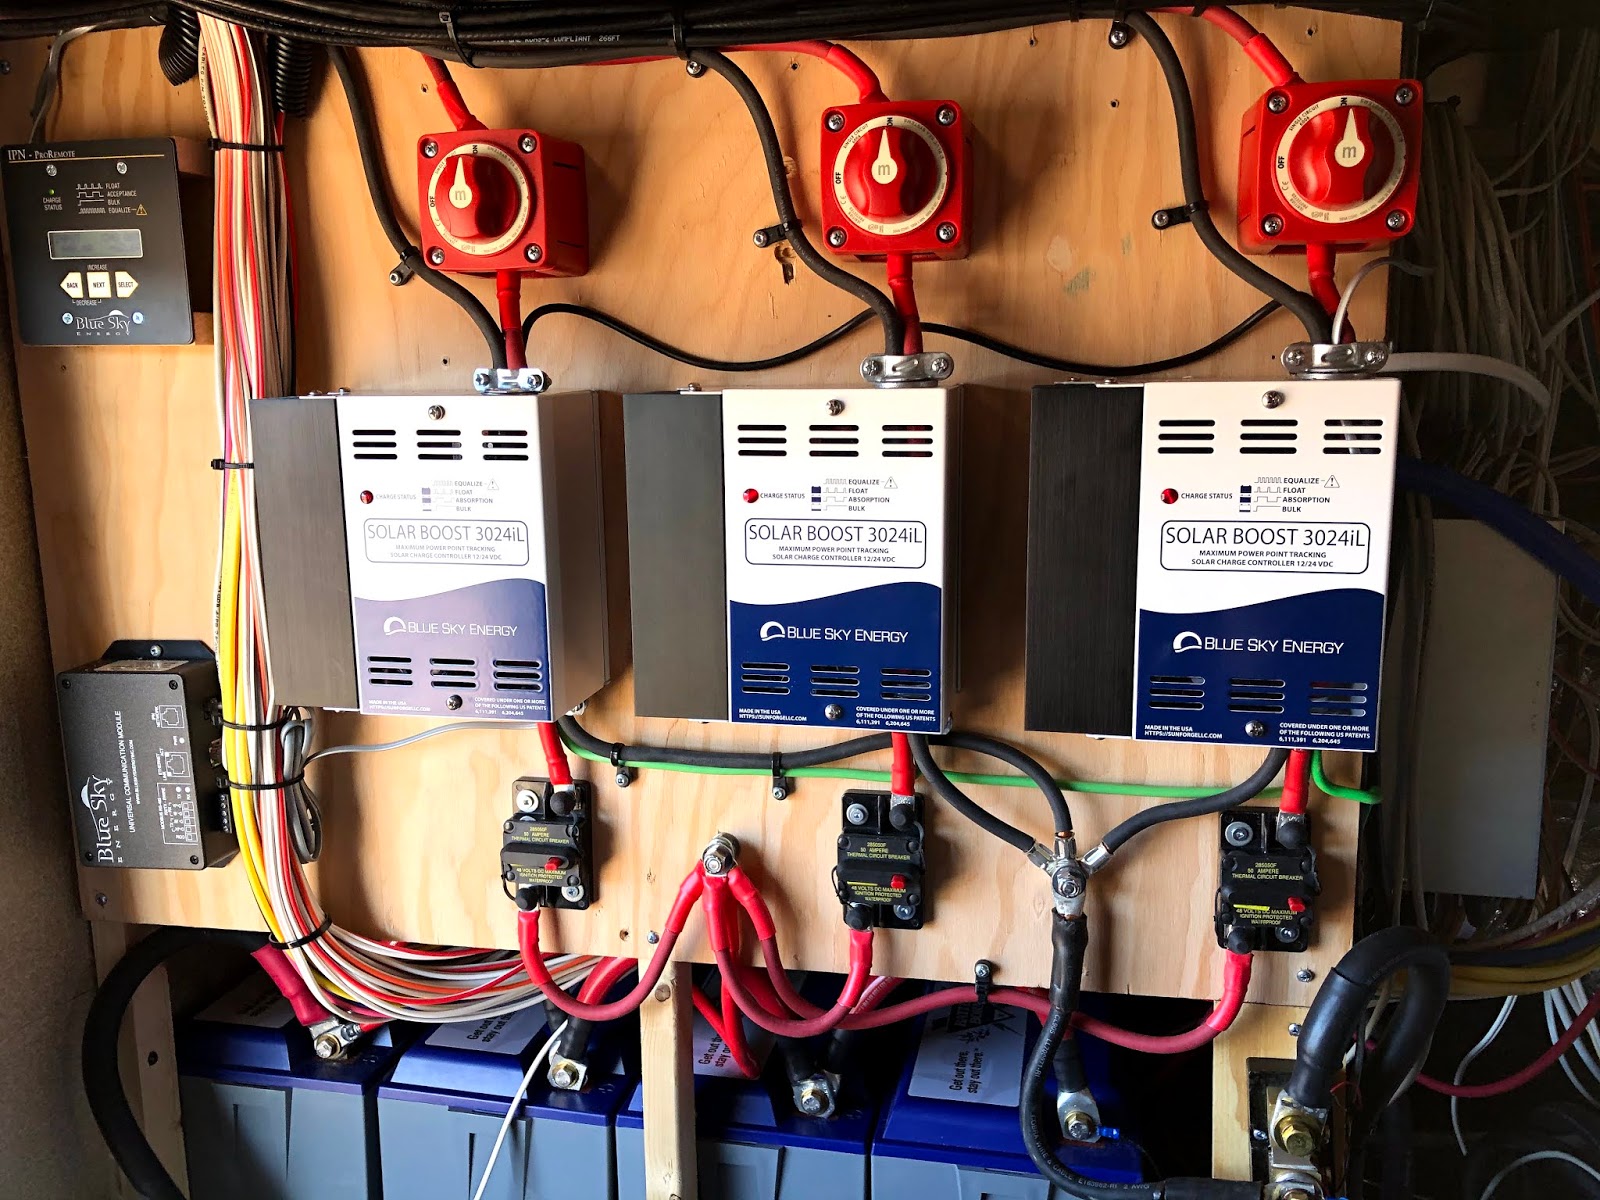
Charge controllers, disconnect switches and circuit breakers as well as the UCM and remote.
Here is the Magnum inverter remote and our existing Bogart Trimetric battery monitor.

So far this system has worked very well. As I suspected earlier, a couple more batteries will give us that little bit extra to get us through 2 or 3 days with poor sun. If I have to, I also have room on the roof to add more panels. Probably not for a while though.
One thing that has taken some experimenting is the charge parameters for the Lithium batteries. They charge quite a bit differently than the old FLA technology. It would be nice to say that the new equipment had built in Lithium settings but sadly, that wasn't the case.
Battle Born though did have a fair bit of advise available on what settings their batteries wanted and it wasn't too difficult to get the basics set up.
I would still like to upgrade the inverter to the MSH3012RV. The main reason being the internal transfer switch is rated for a full 50 Amps rather than the 30 Amps of the MS28212. Maybe next year.
This is the schematic of my install. Click to expand to full size.

******************************
For historic comparison, here is the old system that we had on our 2008 Carriage Cameo.
I have had quite a few people that we have met ask me about our solar setup. I will try and describe what we have, why I chose it and what I would do different in the future.
Note: This document will be a work in progress so if you have any questions please drop me a line via the contact form in the right margin.
We have a total of 1020 Watts of solar panels, all of which are commercial residential type panels rated at about 30 Volts each. 2 of them are 245 Watts each, 1 is 260 Watts and 1 is 270 Watts.

The reason for the differences is that they were bought at different times. The panels are all parallel connected via a junction box on the roof. From the junction box, I used #4 welding cable to connect the roof to the charge controller in the front storage bay.
The charge controller I chose was a MorningStar TS-MPPT-45. I picked this one for its quality and bulletproof reputation. I also installed a standard dual fused air conditioner disconnect to isolate the charge controller when necessary. One side of the disconnect protects the solar input to the charge controller while the other side protects the connection to the batteries. This works well in that when the disconnect is pulled, all power to the charge controller from both the batteries and the panels is disconnected.

The panels are all mounted on the roof of our 5th wheel using brackets I fashioned from 2" aluminum angle stock. We have 2 at the front that are set up to tilt forward; 1 just back of the front left panel set up to tilt to the left and 1 at the back on the right side that (so far) doesn't tilt.
The 2 front ones tilt forward for the simple reason that if we tilted them to the side, one would shade the other. This means that for optimum solar exposure, we have to position the trailer facing south. The front left panel tilts to the side for a similar reason. If it was tilted forward, for a good part of the day it would be shaded by the panel in front of it. A side benefit to tilting to the left or east is that it better catches the morning sun and gives us an early start on charging.

The brackets are attached to the roof using 1/4" lag bolts and lots of Dicor Self Leveling sealant. The process I used was to mark out the position of the panels and where the bolts would penetrate, pilot drill the holes then apply a layer of Dicor on the roof and in the pilot hole. Set the panel with attached brackets in place and secure with the lag bolts. Once secured, apply another coat of Dicor around and over the bracket and bolt head.
So far, I have not noticed any movement or loosening of the brackets despite some pretty heavy winds while parked or headwinds while driving.


 | |
| Note that this photo was taken before I added the 4th panel. |

I must note that it is extremely important to make sure you size your wire gauges to minimize power losses between the solar panels and the charge controller and between the charge controller and the batteries. Try and keep your total losses to less that 2% if you can. There are many wire gauge charts and calculators on the web that will work.

Two other major components were already installed when we bought the trailer. They are the Magnasine MS-2012 inverter/charger and the Go-Power 50 Amp transfer switch.
Due to the positioning of these devices and the limited cable slack to work with, I couldn't move them much to make room for the solar system components hence things aren't quite as neat or organized as I would like.
Our batteries are 4 Trojan T-105's connected in a series parallel configuration. This gives us 450 AH of total capacity or 225 AH of usable capacity assuming a maximum of 50% discharge.
I chose Trojan T-105's because, at the time, they fit our budget and had a good reputation.
Flooded Lead Acid (FLA) batteries prefer to be kept fully charged and the deeper they are discharged, the shorter their life span. The one main drawback with FLA batteries is that you MUST stay on top of the electrolyte level in all the battery cells. If this level gets too low and the plates start to dry out, the battery will be destroyed very quickly!
When we are actively using the system and the batteries are being exercised every day, I religiously check the electrolyte once a month. I usually have to add a little distilled water at this time as well. The other thing I do is to run the batteries through an equalize cycle. Equalizing submits the battery to a higher voltage for about 3 hours. This is especially important if the batteries don't regularly fully recharge. If this happens, sulfur deposits collect on the battery plates (sulfation) and weaken the cells. Equalizing stirs up the electrolyte and forces the sulfur deposits back into solution.
Another thing to be aware of with lead acid batteries is make sure you have your charge voltage thresholds set properly. With both the MorningStar controller and the charger in the MagnaSine, the charge voltages can be set as required. If the voltages are set too low, the batteries do not fully charge and sulfation happens, significantly reducing the life of the batteries.
The last 2 key components of the system are the main DC disconnect switch which is the first thing connected to the positive battery terminal and the 250 Amp 'catastrophe' fuse which is right after the disconnect switch.

If I had to do this all over there are a few changes I would make.
For starters I think I would choose different panels. While our panels are good ones and put out a good amount of current for their size, they are a bit on the large size physically. There are other very good panels that are a bit smaller that would probably be easier to fit on the roof.
Secondly, I would choose a larger solar charge controller. When I chose this one, 2 panels was all I had intended to install and its maximum output of 45 Amps was ideal. We are now running 4 panels which at certain times maxes out the controller. The extra input capacity doesn't bother the controller but the output is restricted to 45 Amps. MorningStar has a 60 Amp version which I think would better fit our needs right now. There are other quality controllers that would also work well and probably should be considered.
As I mentioned, the trailer came with the Magnum Energy MagnaSine MS-2012 inverter charger which is and has been a very good unit. If I were to do this over though, I think I would probably choose their new MSH 3012 3000 Watt Hybrid unit.
Probably the biggest change would be to replace our Trojan FLA batteries with new technology Lithium batteries. Lithium doesn't have the deep discharge limitation that FLA does. They can be regularly discharged to almost nothing without harm. They also can be recharged at much higher rates. The biggest drawback is their cost. They run about 4 times the cost of FLA's.
When we bought our first trailer, a used Thor Wave, back in 2012, we spent the first season with just the basics that it came with. No solar and just the basic converter for charging. It did have 2 6 volt GC2 batteries though. That first summer and fall, we quickly learned that a lot of our camping would be dry; i.e. no hook ups, and that we would need something other than just a generator to supply our power needs.
That winter I spent a lot of time on-line researching solar energy solutions. In my reading I learned that a lot of people had systems installed by so called pros at RV dealerships whose systems simply didn't work. One web site that I found which was invaluable in starting me down the right path, was a blog by a guy who goes by the name of HandyBob. He wrote a number of articles on how to make RV solar systems work. His blog, "Making off grid RV electrical systems work" goes into great detail on the technical aspects of batteries, chargers, wiring and monitors. His series of articles are a must read for anyone considering installing a solar system regardless of whether they want to do the work themselves or have a professional do it for them.
Hi Rob, Thanks for sharing your journey. Solar power is somewhat new to us, we had a 500 watt supply with a 3000 watt MSW Harbor Freight inverter. Recently we lost two of the five 100 watt panels due to high winds and are under taking a few upgrades. The replacement 3000 watt Pure Sine inverter arrived two weeks ago and is awaiting installation. I'm still looking at panels and mounting systems. As well as rewiring the main panel connections via a second transfer switch. Do you have any suggestions about tilt-able mounting and inverter feeding into the main panel? ie L1 and L2 Thanks, Michael
ReplyDeleteHey Rob, Never heard from you, and I just read your latest blog. We are awaiting our new system components from Continuous Resources.
ReplyDeleteWe've decided to go with 6 NewPowa 200 watt panels, a Victron 24v/3000 inverter and a Victron 100/50 Solar charger. This unit manages the demand for power by using other power sources, Basically its a UPS for the whole 5th Wheel. Check out Rod at https://www.youtube.com/channel/UCtFOY3-QMfsEkLqhf4q6s8w
Hi Michael.
DeleteThat setup should do you nicely! Victron makes good stuff. I debated Victron when designing my new system but the fact they don't have a split phase capable inverter pointed me back to Magnum.
One thing you should invest in is a 'good' battery monitor such as Victrons BMV-712.
I look forward to seeing your new setup next time we are allowed south!
MPPT controller I have read all the comments and suggestions posted by the visitors for this article are very fine,We will wait for your next article so only.Thanks!
ReplyDelete